
✅ 개요
💡 1차프로젝트에서 결제 기능을 맡게 되었다.
회의를 통해 토스 페이먼츠에서 제공하는 결제 API를 사용하기로 결정하였고 그 도입 과정에 대해서
이야기해보고자 한다.
✅ Toss Payments API를 도입한 이유
문서 가독성
특정 외부 API를 도입할 때 가장 중요한 것 중 하나가 문서의 가독성이라고 생각한다.
그런 점에서 Toss Payments API는 매우 훌륭하다고 할 수 있다.


샘플 코드 제공
Toss Payments API는 샘플코드를 제공하는데 프론트엔드, 백엔드 환경에 맞는 코드를 제공받을 수 있다.
이를 통해 플로우를 빠르게 이해해 내 서비스에 빠르게 도입할 수 있다.

✅ Toss Payments 결제 플로우 이해하기
우선 프로젝트에 도입하기에 앞서 샘플코드를 통해 결제 플로우 학습을 진행하였다.
연동하기 | 토스페이먼츠 개발자센터
토스페이먼츠의 간편한 결제 연동 과정을 한눈에 볼 수 있습니다. 각 단계별 설명과 함께 달라지는 UI와 코드를 확인해보세요.
docs.tosspayments.com
0️⃣ 전체적인 플로우

1️⃣ 결제위젯 랜더링

1. 구매자가 상품을 선택해 주문서에 진입한다.
2. 프론트엔드는 토스페이먼츠에 결제 위젯 렌더를 요청한다.
3. 토스페이먼츠는 프론트엔드에 결제위젯을 랜더링 해준다.
4. 구매자는 프론트엔드가 받아온 결제위젯 화면을 본다.
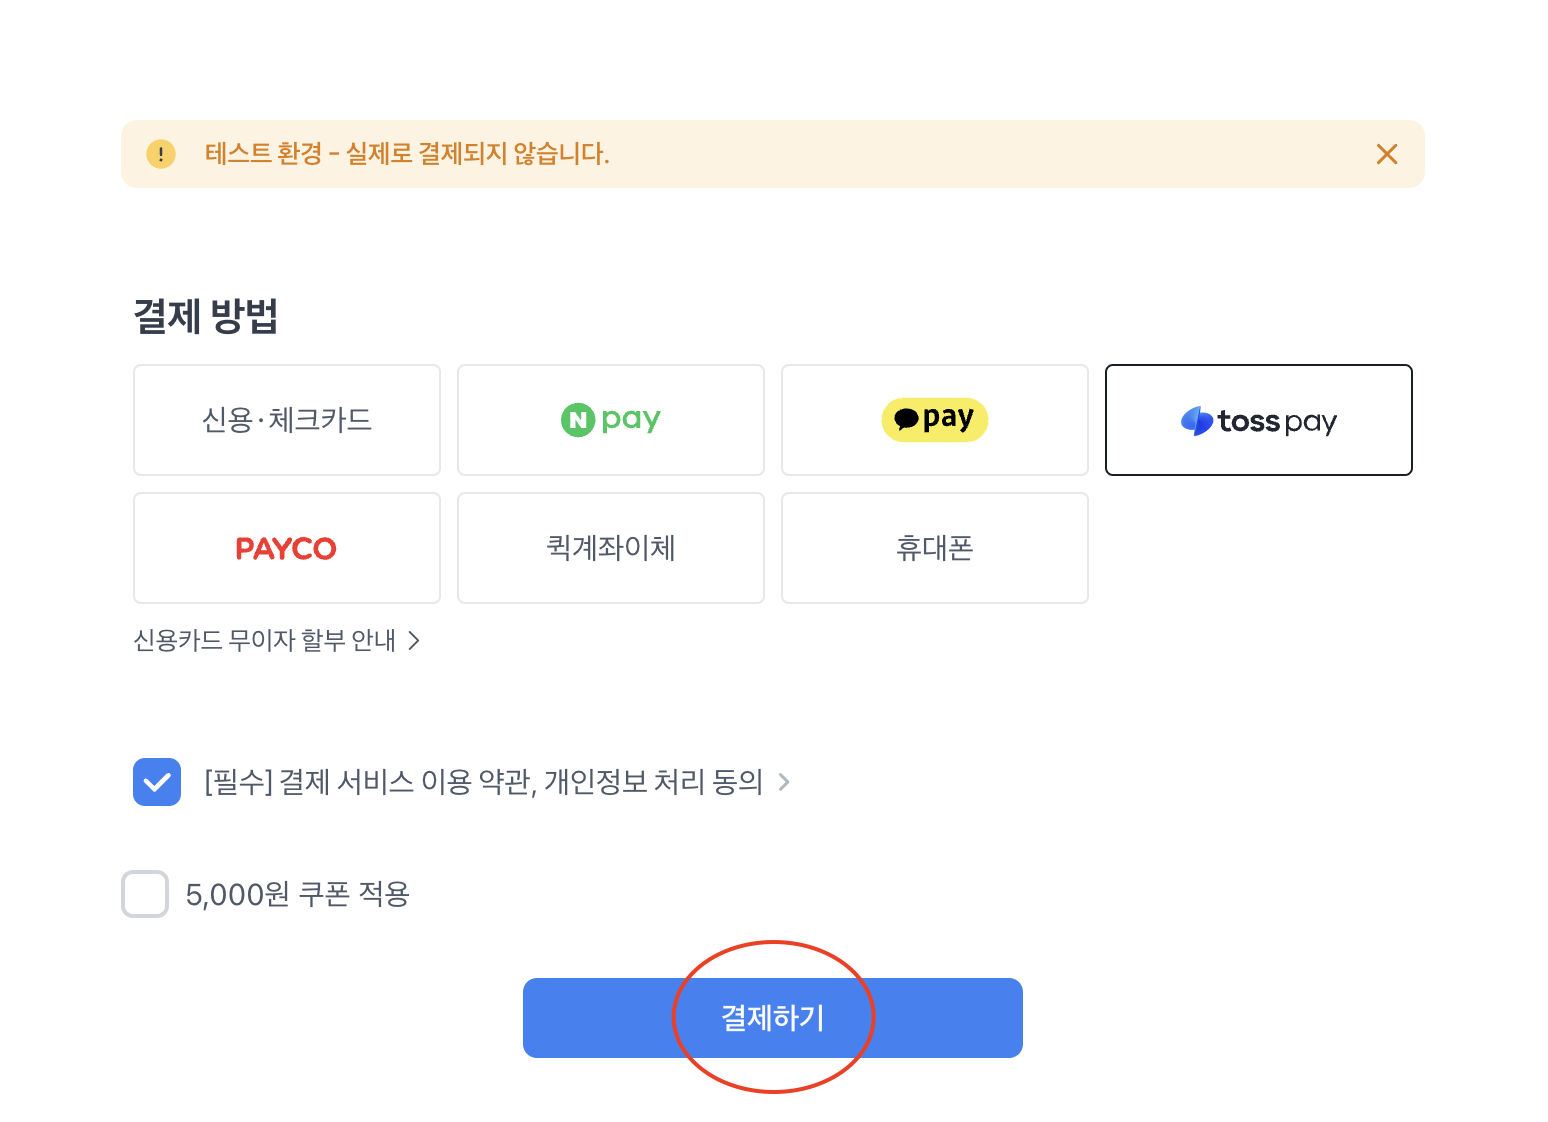
결제위젯 화면은 다음과 같다.
구매자는 해당 화면에서 결제수단을 선택하게 된다.

2️⃣ 결제 수단 선택 및 결제 요청
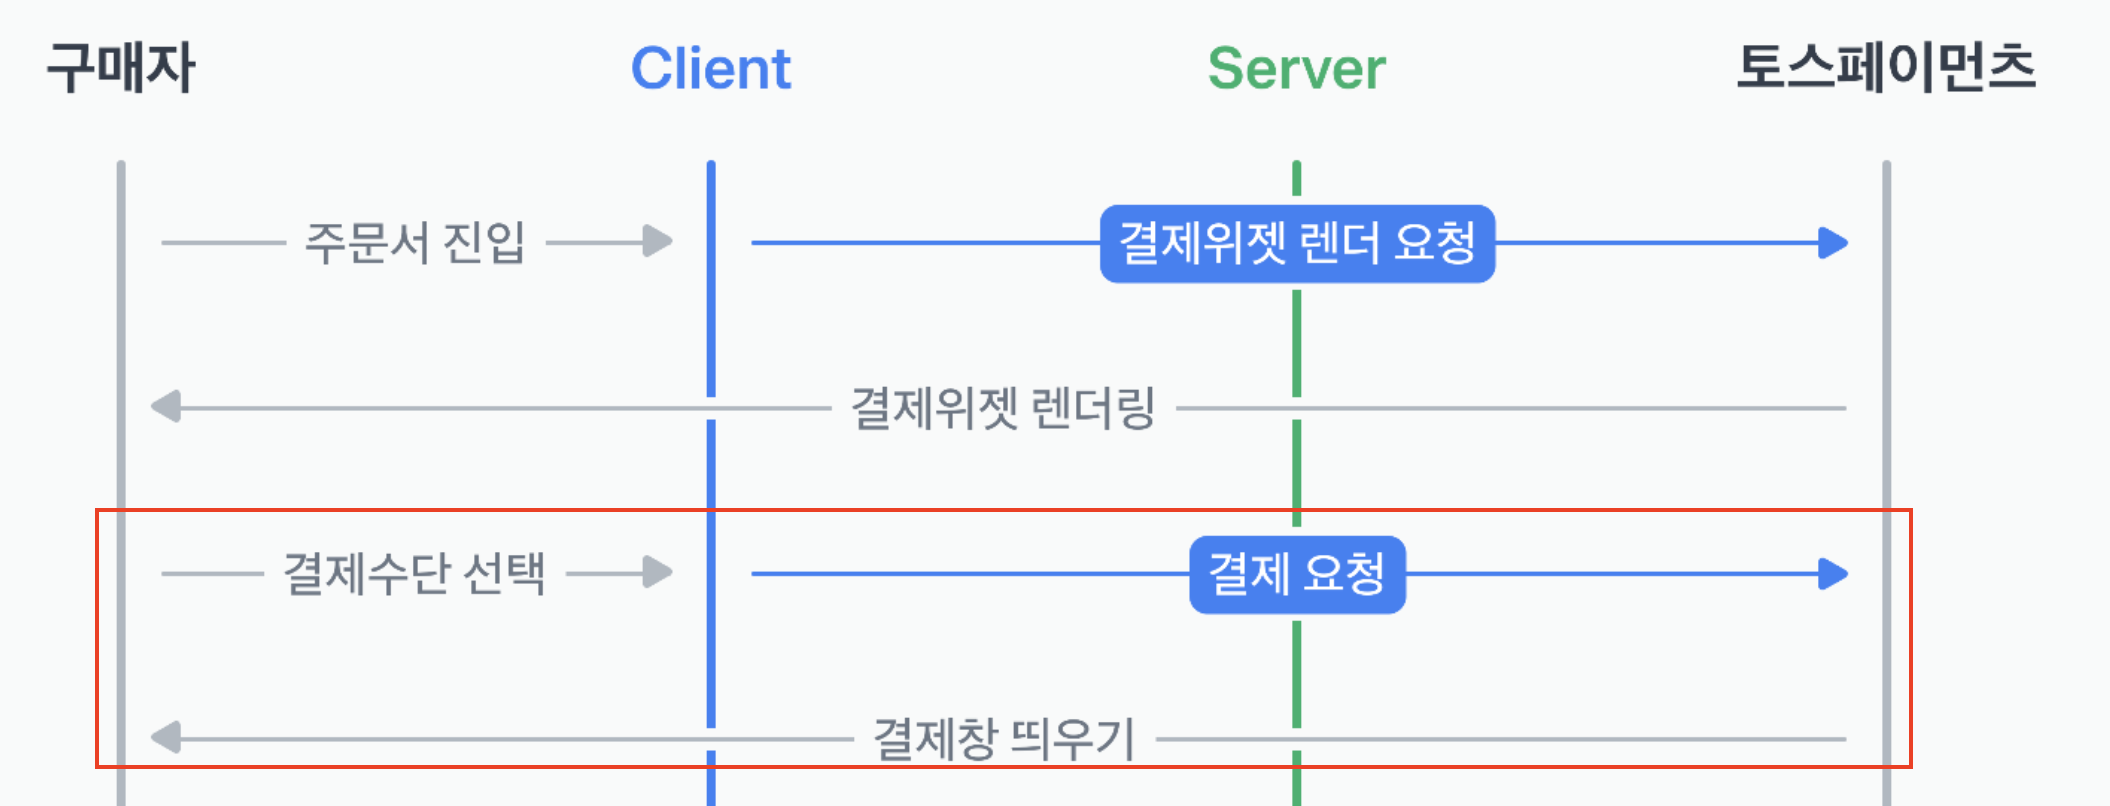
1. 구매자가 결제수단을 선택하고 결제하기 버튼을 클릭한다.
- 이전에 프론트엔드 코드에서 반드시 해줘야 하는 작업이 있다. widgets.setAmount()를 호출해 결제 금액을 지정해줘야 한다.
// ------ 주문의 결제 금액 설정 ------
await widgets.setAmount({
  currency: "KRW",
  value: 50000,
});
2. 결제수단을 선택하고 결제하기 버튼을 누르면 프론트에서 토스페이먼츠에 결제 요청을 한다.
- 결제를 요청하는 함수는 widgets.requestPayment()이다.
widgets.requestPayment({
  orderId: generateRandomString(),
  orderName: "토스 티셔츠 외 2건",
  successUrl: window.location.origin + "/success.html",
  failUrl: window.location.origin + "/fail.html",
  customerEmail: "customer123@gmail.com",
  customerName: "김토스",
  customerMobilePhone: "01012341234",
});
- 여러가지 정보를 파라미터로 넘겨주는데 중요한 것은 orderId, successUrl, failUrl이다.
- orderId: 결제에 대한 주문 아이디이다. 적절하게 랜덤한 값을 생성해서 집어 넣어야 한다.
- successUrl: 결제 성공시 이동할 url이다.
- failUrl: 결제 실패시 이동할 url이다.
- 이때 토스에서는 결제금액 무결성을 위해 orderId와 amount를 백엔드 서버에 임시저장할 것을 권하고 있다.

나는 해당 정보를 세션을 통해 관리할 생각이다.
3. 결제창을 띄워준다
- widgets.requestPayment()함수는 결제창도 함께 띄워준다.
예시: 토스 결제
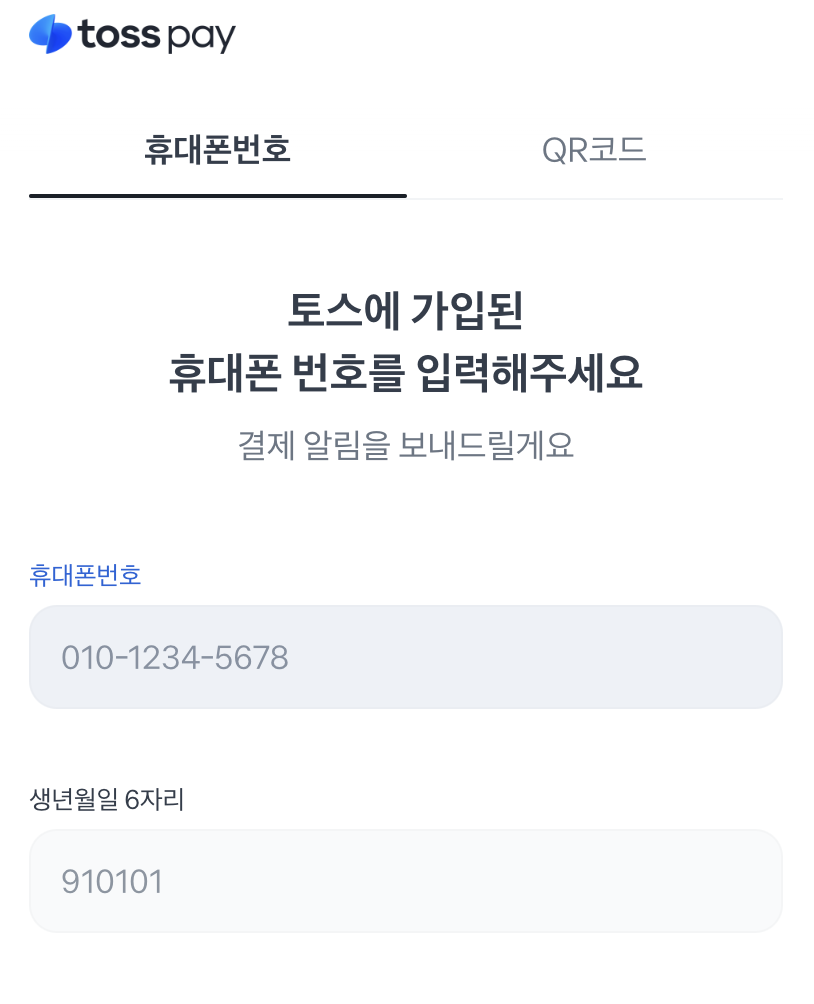
3️⃣ 결제정보 입력 및 결제시도

1. 구매자가 결제창을 통해 결제를 진행한다.

2. 성공시 successUrl로 이동한다.
- 이때 다음과 같은 네 가지 정보가 쿼리 파라미터에 추가된다.

- 이때 토스는 앞서 저장했던 amount값을 백엔드 서버에서 검증하는 것을 권고하고 있다.

이 역시 백엔드 서버에 반영할 생각이다.
4️⃣ 결제 정보 전달 및 결제 승인 요청
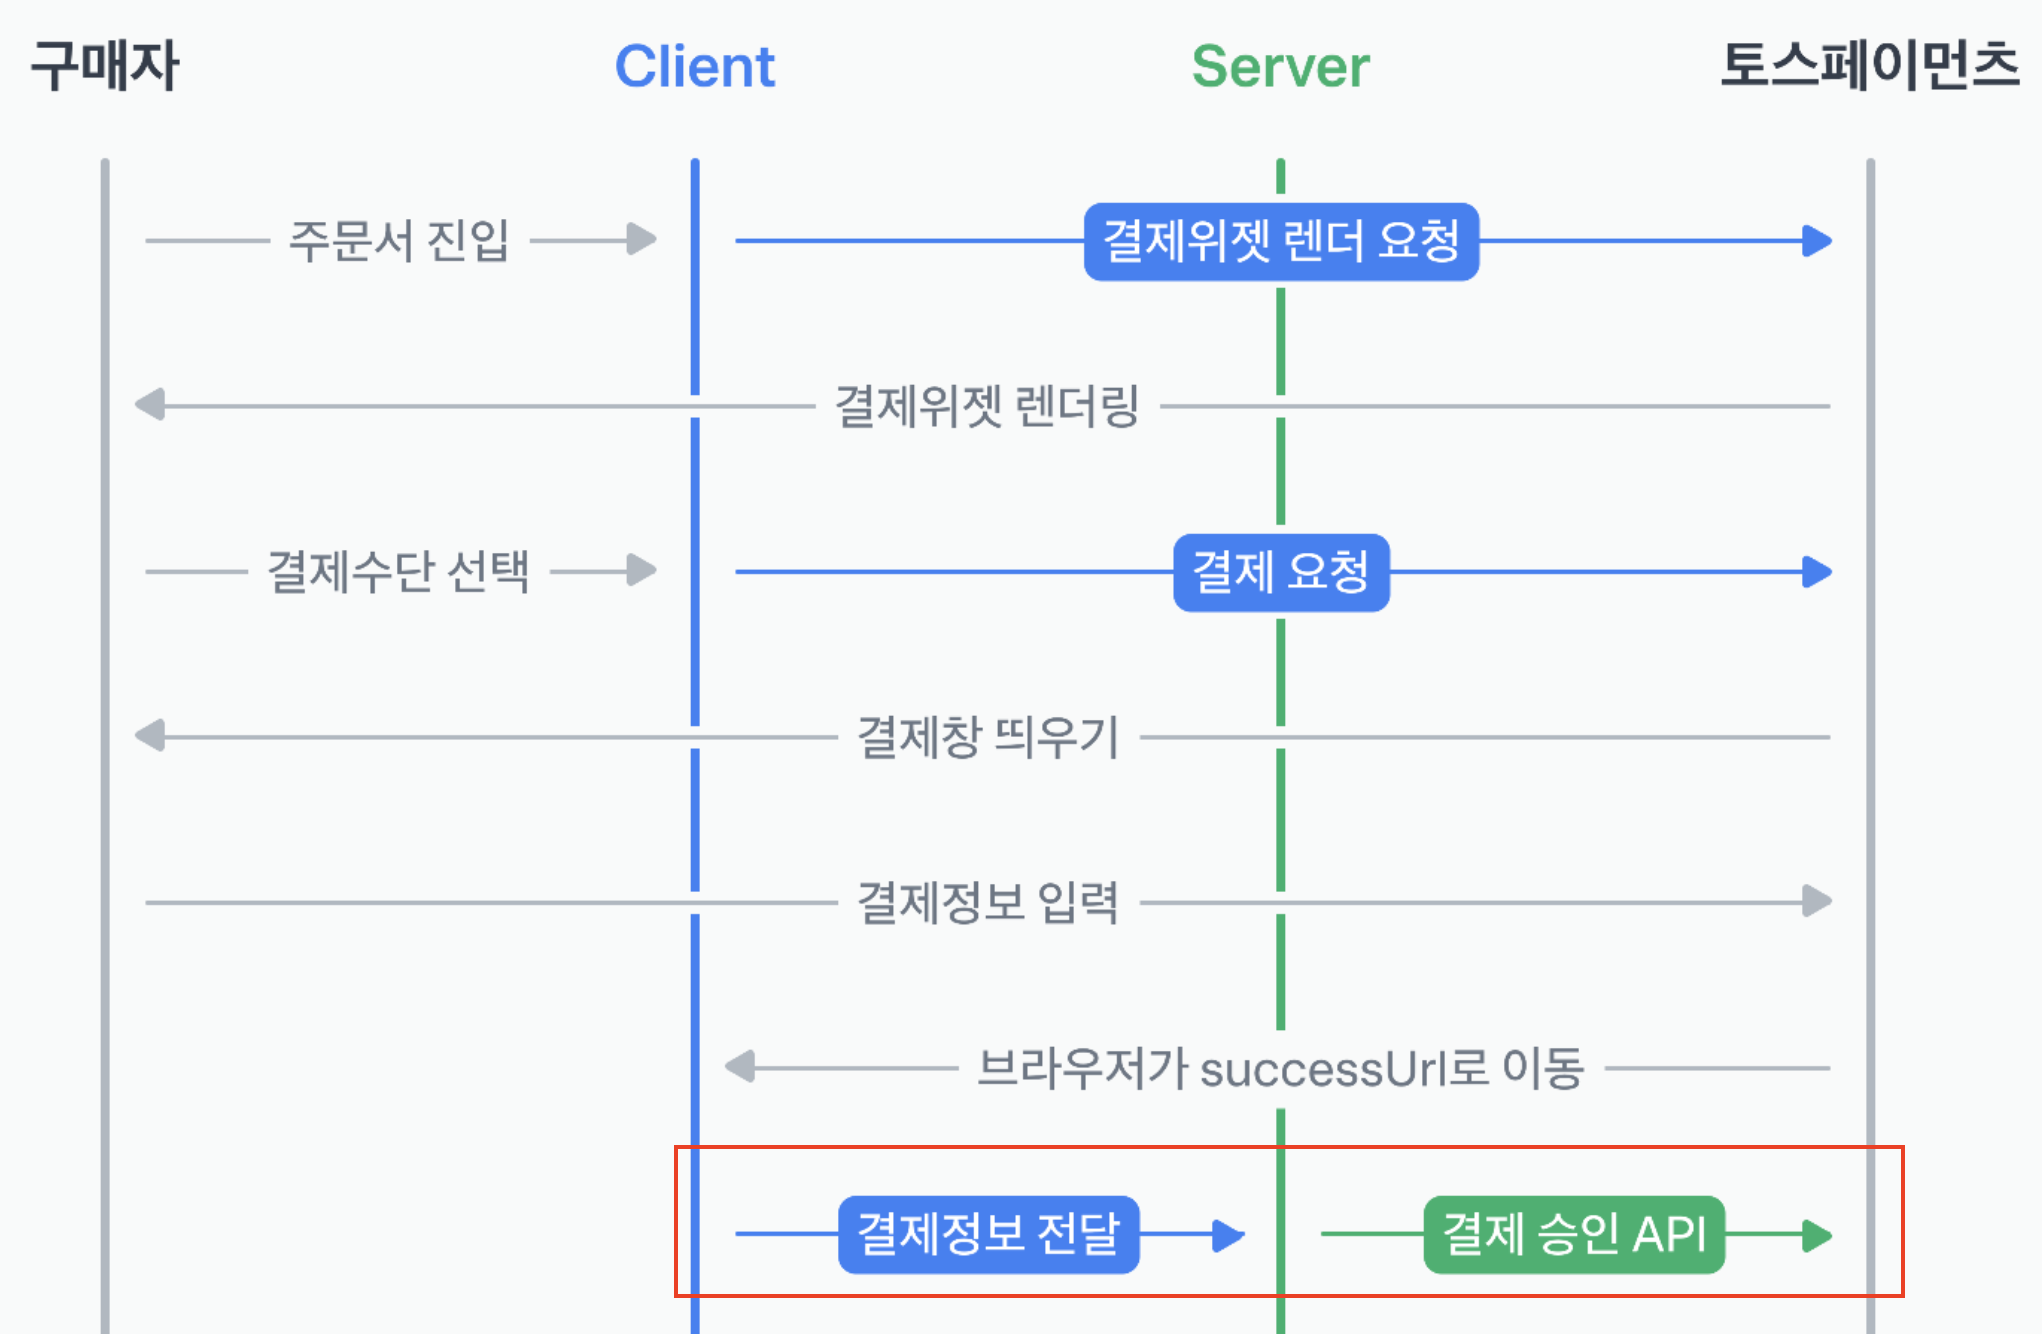
1. 백엔드 서버에 결제정보를 전달한다.
- 이는 결제 승인 요청을 대신해주기 위함인데 프론트엔드에서 토스페이먼츠로 바로 해주는 것이 아니라 백엔드를 한번 거친다는 것이 특징이다.
이유는 구체적으로 언급되어 있지 않지만 결제 승인 API를 보낼 때 시크릿키를 넣는데 이것이 프론트엔드에서 관리되면 유출된 위험이 높기 때문에 백엔드를 거치는 것 같다. - 이 때, 서버에는 다음과 같은 정보를 전달해야 한다고 한다.

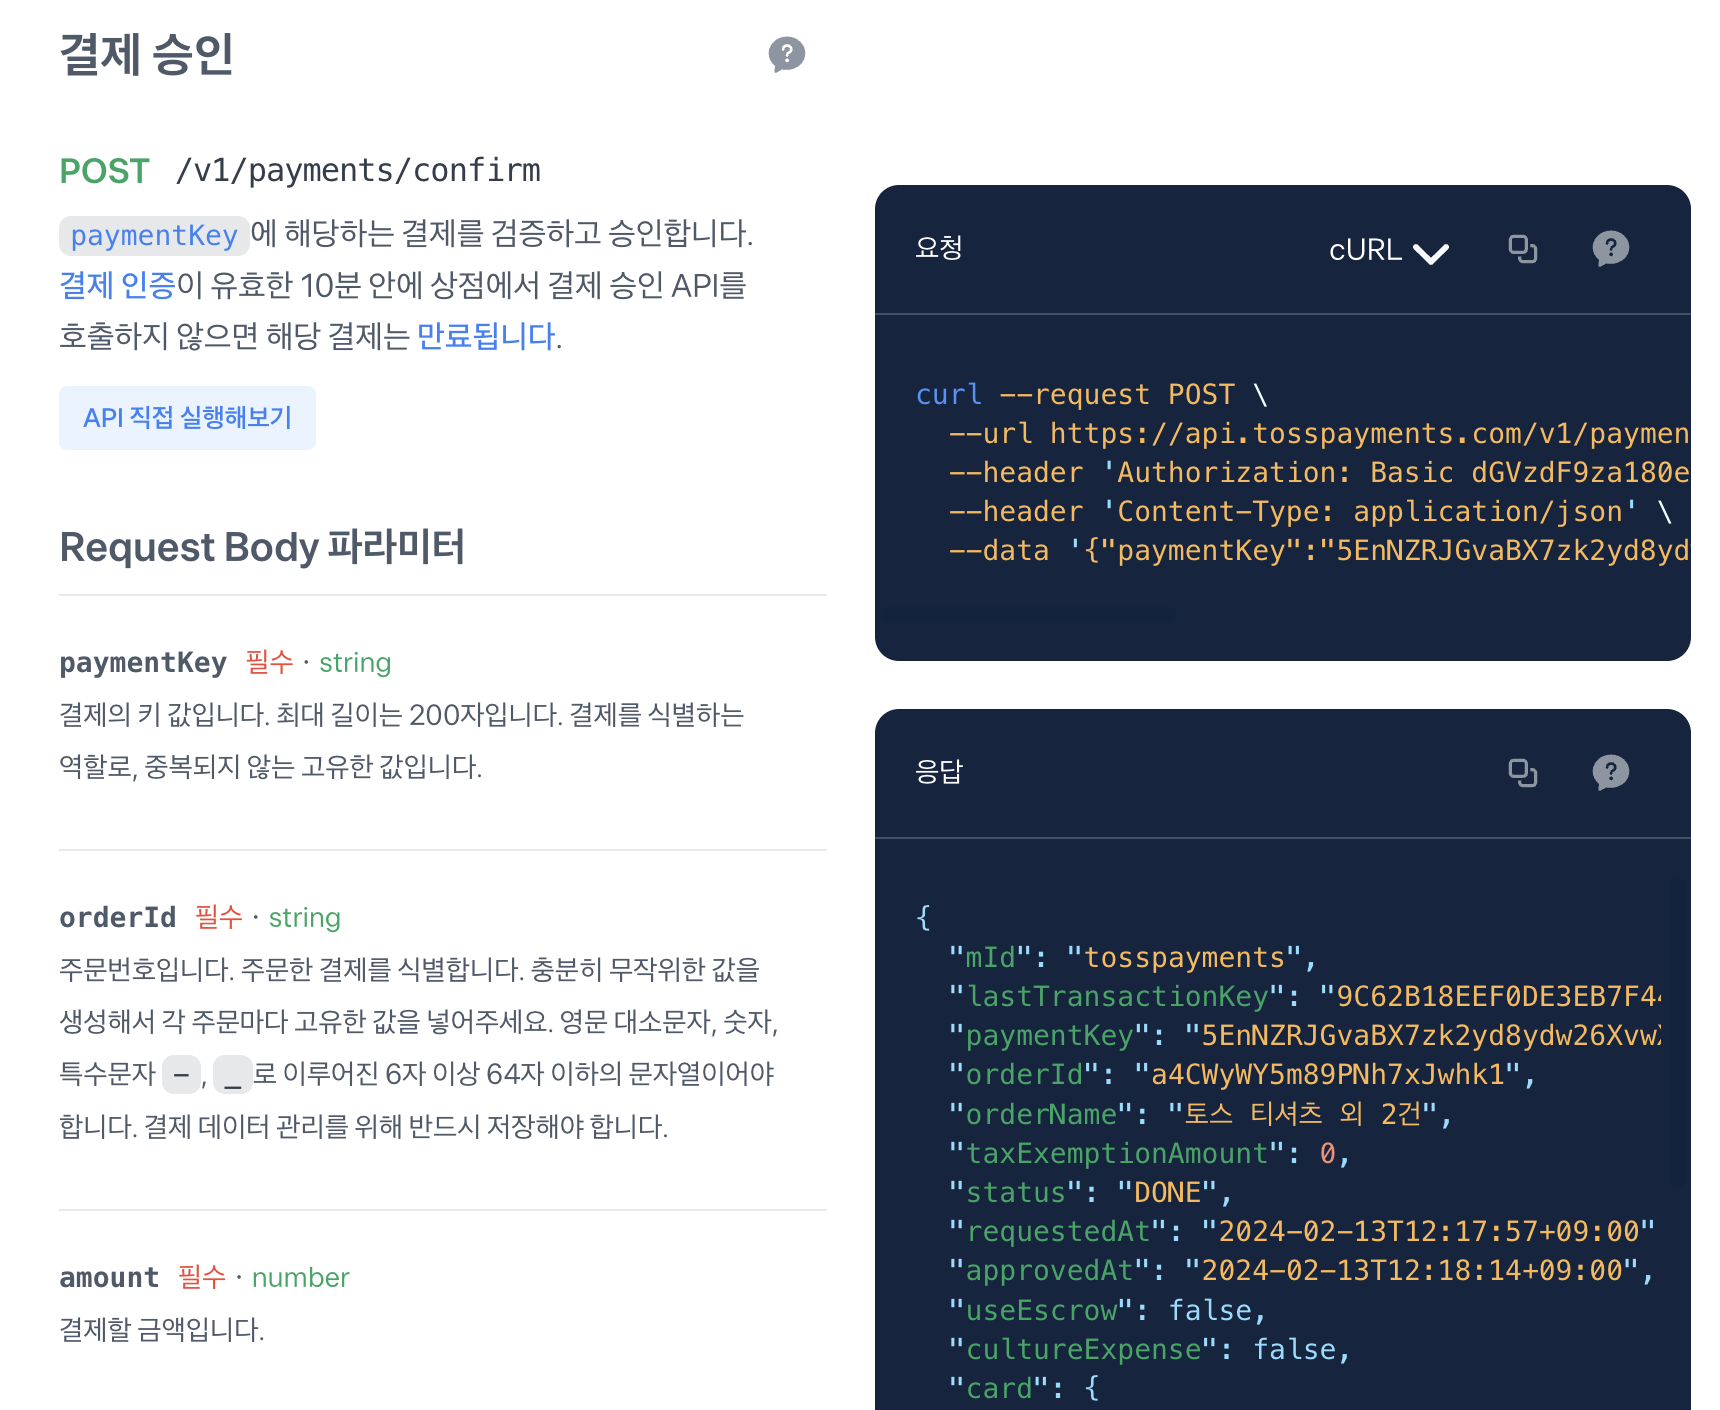
2. 백엔드 서버는 토스페이먼츠 측으로 결제 승인 API 요청을 보낸다.
- 결제 승인 API에 대한 명세는 다음과 같다.
paymentKey, orderId, amount가 필수적으로 들어가야 한다고 한다. 이것들은 바로 프론트 서버에서 받아온 정보들이다.
코어 API | 토스페이먼츠 개발자센터
토스페이먼츠 API 엔드포인트(Endpoint)와 객체 정보, 파라미터, 요청 및 응답 예제를 살펴보세요.
docs.tosspayments.com
- 승인 성공시 payment라는 객체를 받아오는데 다양한 필드들이 존재한다. 여기서 서비스 요구사항에 맞는 필드들을 선정해 데이터베이스에 저장하면 될 것 같다.

코어 API | 토스페이먼츠 개발자센터
토스페이먼츠 API 엔드포인트(Endpoint)와 객체 정보, 파라미터, 요청 및 응답 예제를 살펴보세요.
docs.tosspayments.com
5️⃣ 결제 승인결과 전달
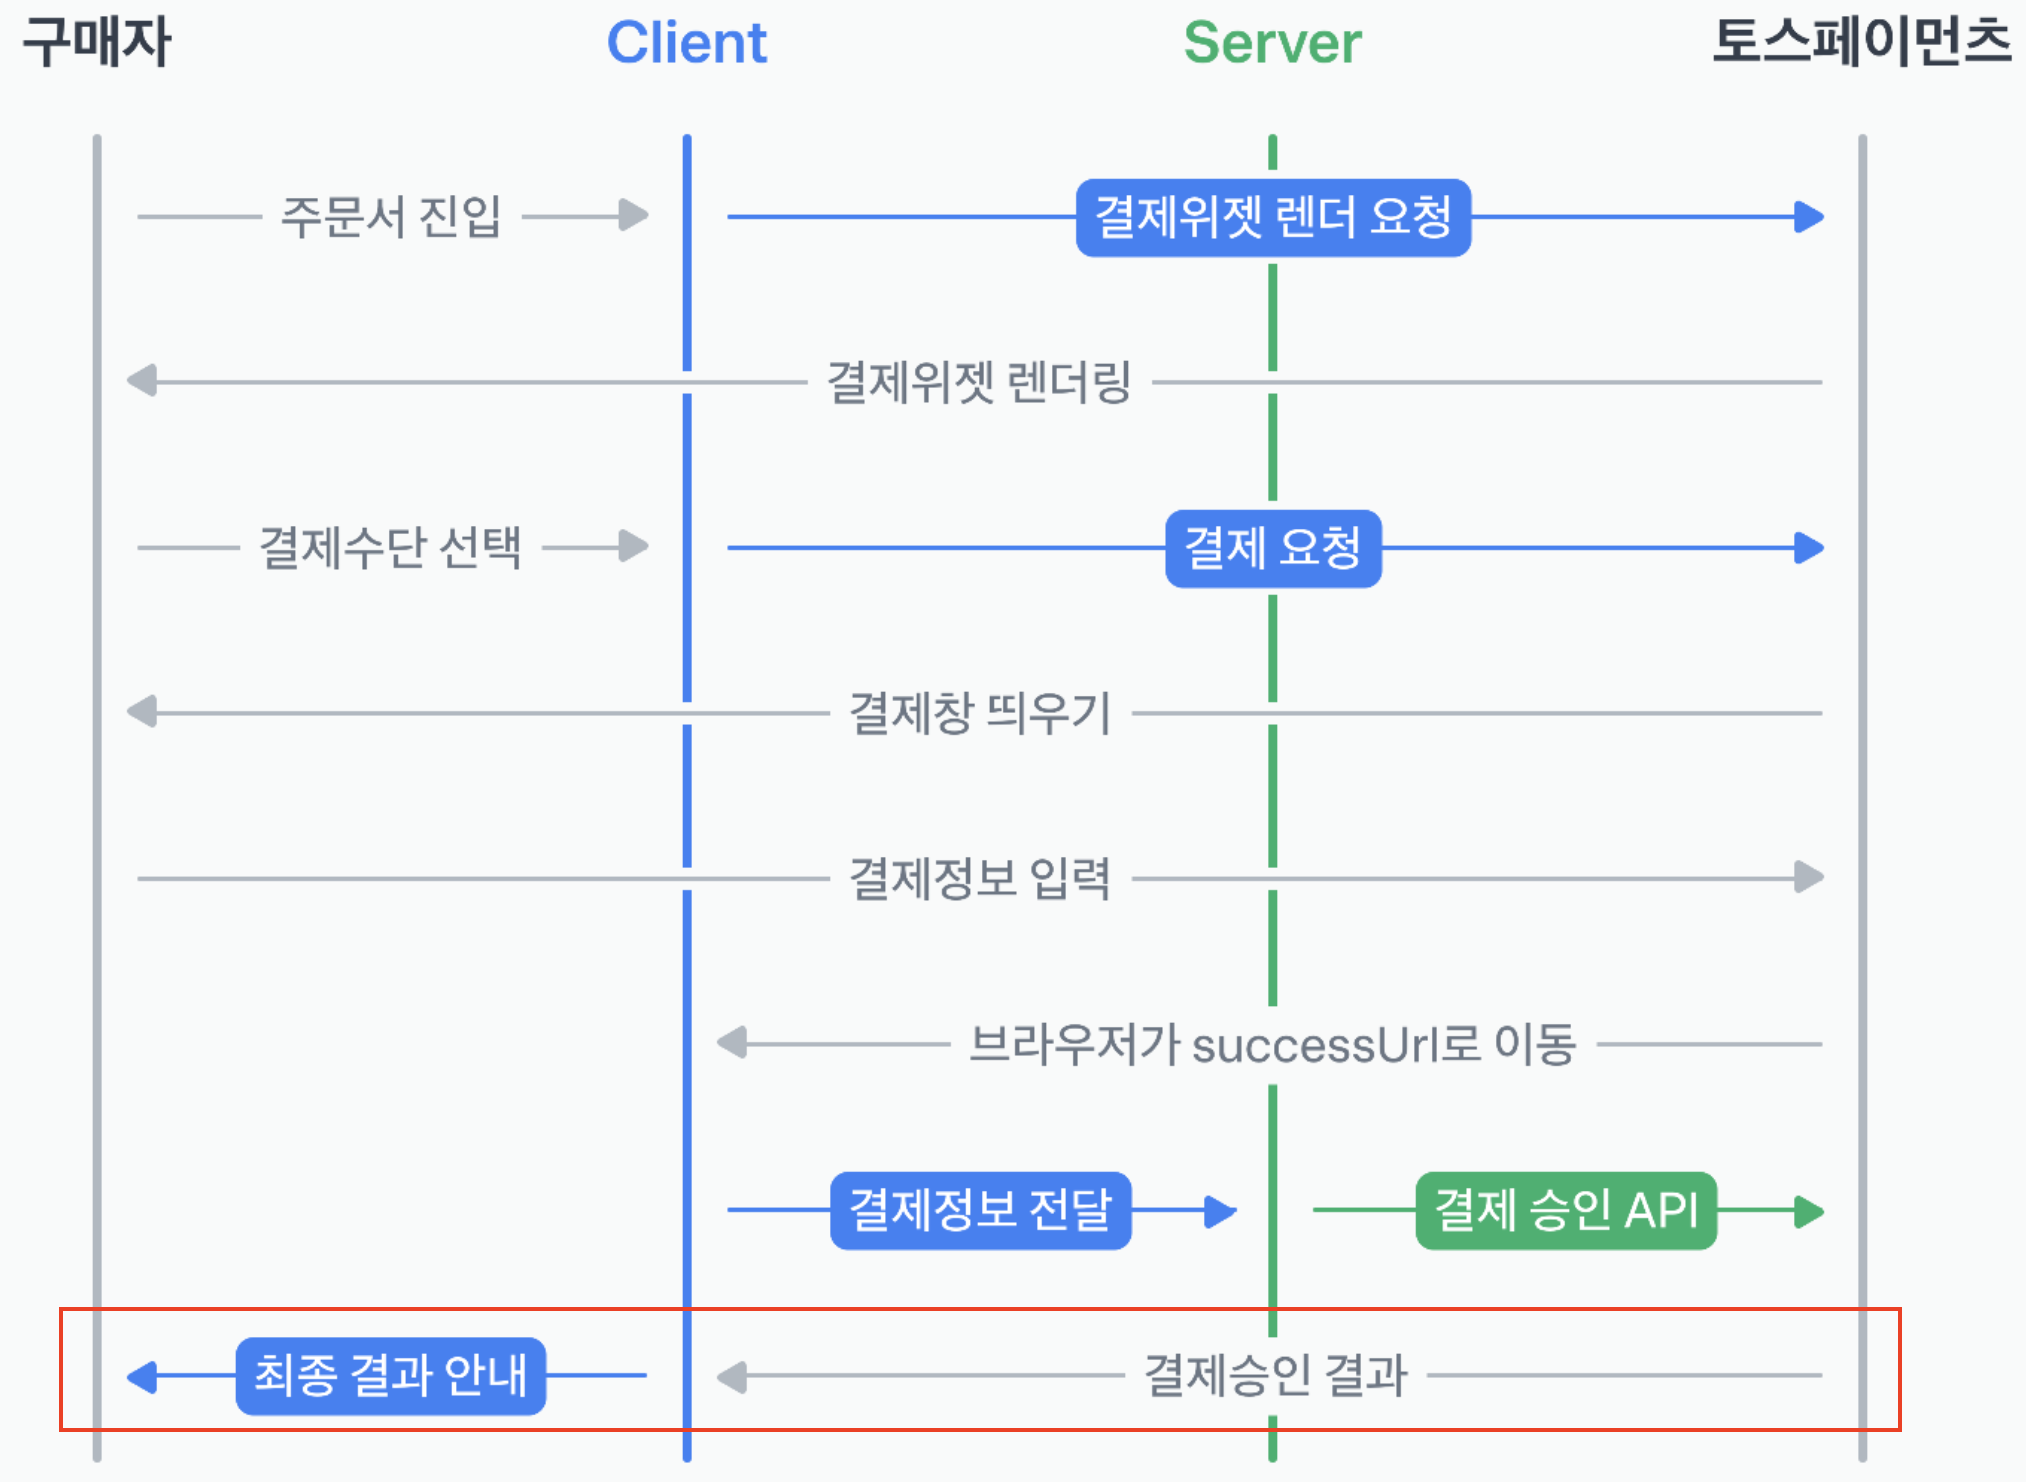
1. 결제 승인 결과를 백엔드에서 프론트에게 제공한다.
2. 최종 결과를 구매자에게 제공한다.
-----------------------------------------------------------------------
✅ Toss payments Spring boot 백엔드 서버 구현하기
💡지금까지 기본적인 Toss Payments의 결제 플로우를 알아보았다.
이제 본격적으로 프로젝트에 반영해보도록 하겠다.
Spring boot Server가 제공해야하는 API는 다음과 같다.

위는 반드시 제공되어야 하는 API이고
나는 추가적으로 결제 조회 API와 결제 취소 API를 추가적으로 구현했다.
0️⃣ TossPayment 테이블 및 엔티티 설계하기
DDL
CREATE TABLE TossPayment (
    payment_id VARBINARY(255) NOT NULL PRIMARY KEY,
    order_id BINARY(16) NOT NULL UNIQUE,
    toss_order_id VARCHAR(255) NOT NULL,
    toss_payment_key VARCHAR(255) NOT NULL UNIQUE,
    toss_payment_method ENUM('가상계좌','간편결제','게임문화상품권','계좌이체','도서문화상품권','문화상품권','카드','휴대폰') NOT NULL,
    toss_payment_status ENUM('ABORTED','CANCELED','DONE','EXPIRED','IN_PROGRESS','PARTIAL_CANCELED','READY','WAITING_FOR_DEPOSIT') NOT NULL,
    total_amount BIGINT NOT NULL,
    approved_at DATETIME(6) DEFAULT NULL,
    requested_at DATETIME(6) NOT NULL,
    CONSTRAINT fk_order_id FOREIGN KEY (order_id) REFERENCES orders(order_id)
);
TossPayment 테이블같은 경우 Order 테이블과 1대1 관계를 맺는다.
이때 TossPayment 쪽에 외래키를 두었는데 그 이유는 추후 비즈니스 로직이 변경 되어 하나의 주문이 여러 개의 결제는 가질 수 있지만, 반대로 하나의 결제가 여러 개의 주문을 가질 일은 절대로 없기 때문이다.
@Entity
이를 기반으로 작성한 JPA 엔티티 클래스는 다음과 같다.
@Entity
@Getter @Setter
@Builder
@NoArgsConstructor(access = AccessLevel.PROTECTED)
@AllArgsConstructor(access = AccessLevel.PRIVATE)
public class TossPayment {
    @Id
    byte[] paymentId;

    @Column(nullable = false, unique = true)
    String tossPaymentKey;

    // 토스내부에서 관리하는 별도의 orderId가 존재함
    @Column(nullable = false)
    String tossOrderId;

    @OneToOne
    @JoinColumn(name = "order_id", nullable = false)
    Order order;

    long totalAmount;

    @Enumerated(value = EnumType.STRING)
    @Column(nullable = false)
    TossPaymentMethod tossPaymentMethod;

    @Enumerated(value = EnumType.STRING)
    @Column(nullable = false)
    TossPaymentStatus tossPaymentStatus;

    @Column(nullable = false)
    LocalDateTime requestedAt;

    LocalDateTime approvedAt;

		// 기타 메서드 생략...
}- paymentId: 기본키. uuid형태
- tossPaymentKey: Toss Payments에서 제공하는 결제에 대한 식별 값
- tossOrderId: 프론트에서 지정한 orderId.
- order: 1대1 연관관계에 있는 Order 객체
- totalAmount: 총 결제 금액
- tossPaymentMethod: 결제 방식
- tossPaymentStatus: 결제 상태
- requestedAt: 결제 요청 시간
- approvedAt: 결제 승인 시간
1️⃣ orderId, amount 임시 저장 API

/**
 * 결제의 금액을 세션에 임시저장
 * 결제 과정에서 악의적으로 결제 금액이 바뀌는 것을 확인하는 용도
 */
@PostMapping("/saveAmount")
public ResponseEntity<?> tempsave(HttpSession session, @RequestBody SaveAmountRequest saveAmountRequest) {
    session.setAttribute(saveAmountRequest.orderId(), saveAmountRequest.amount());
    return ResponseEntity.ok("Payment temp save successful");
}
테스트
요청
{
	"orderId": "MC42Nzg3MTc2OTQ5ODYz",
	"amount": 1000
}
응답
"Payment temp save successful"

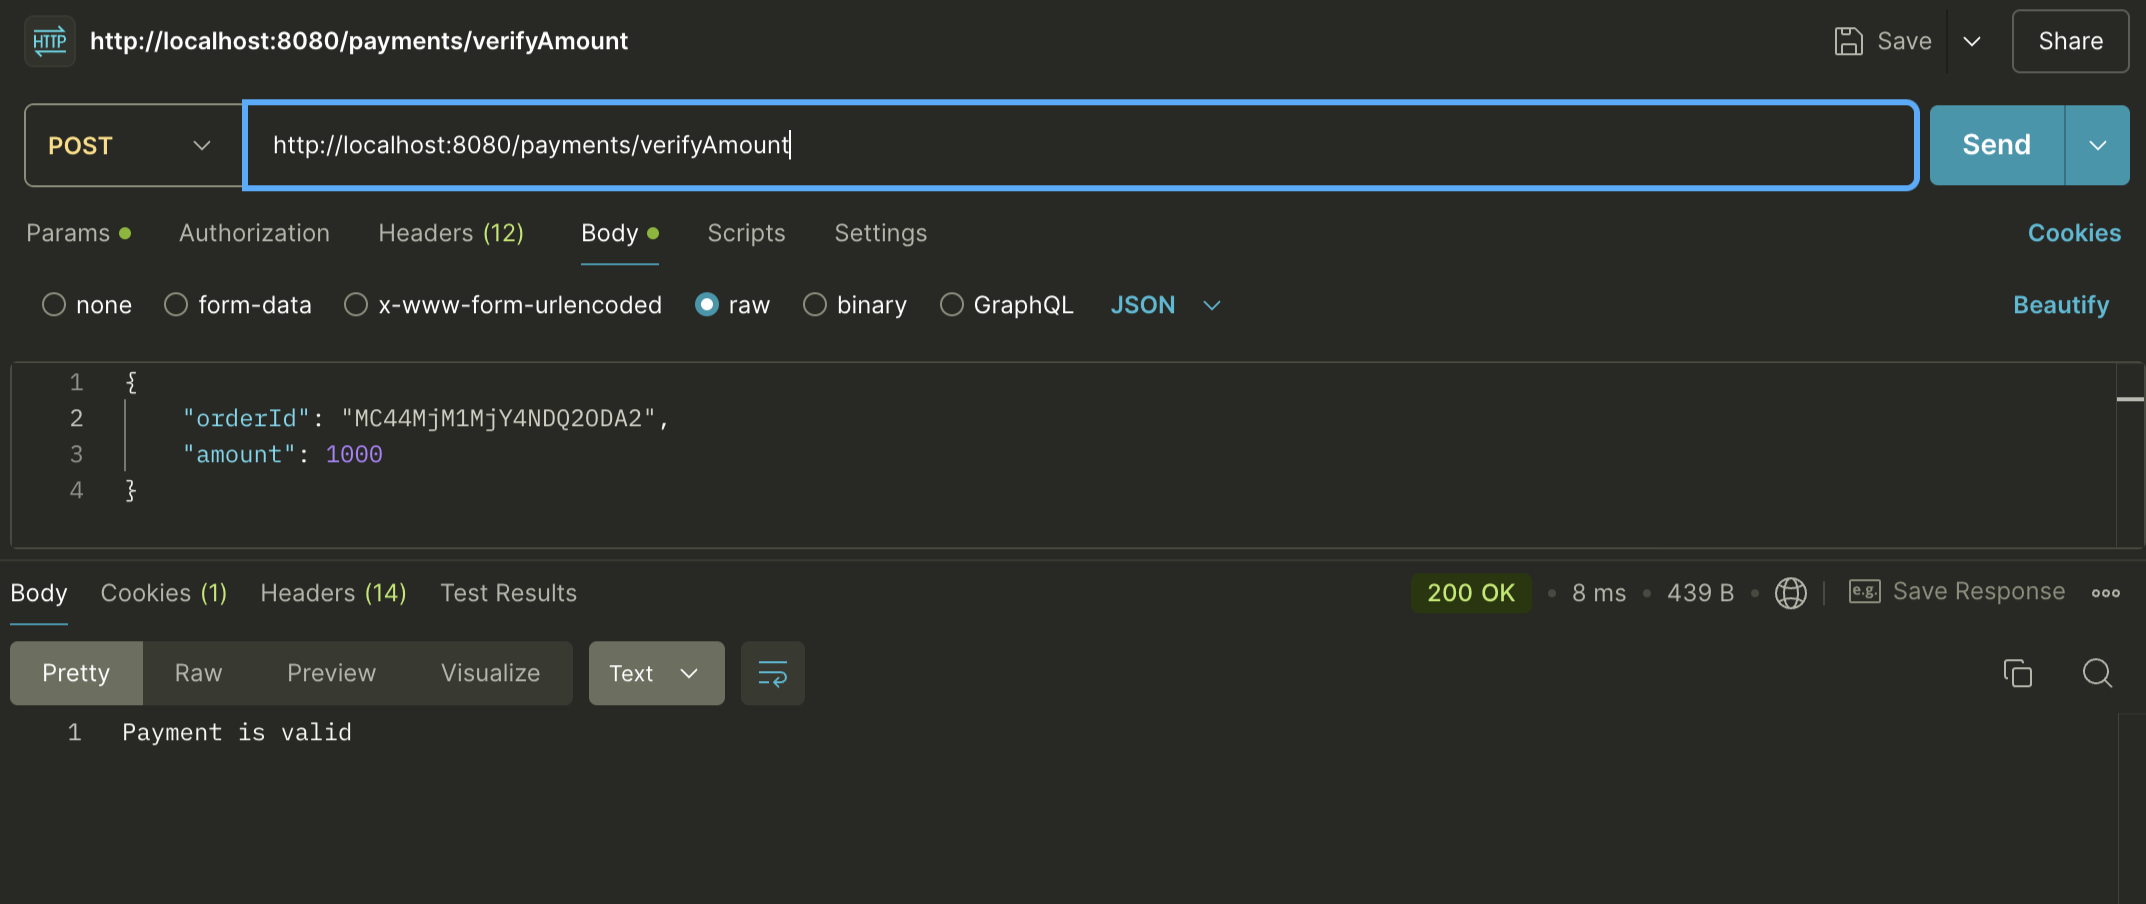
2️⃣ orderId, amount 검증 API

/**
 * 결제 금액을 검증
 */
@PostMapping("/verifyAmount")
public ResponseEntity<?> verifyAmount(HttpSession session, @RequestBody SaveAmountRequest saveAmountRequest) {

    String amount = (String) session.getAttribute(saveAmountRequest.orderId());
    // 결제 전의 금액과 결제 후의 금액이 같은지 검증
    if(amount == null || !amount.equals(saveAmountRequest.amount()))
        return ResponseEntity.badRequest().body(PaymentErrorResponse.builder().code(400).message("결제 금액 정보가 유효하지 않습니다.").build());

    // 검증에 사용했던 세션은 삭제
    session.removeAttribute(saveAmountRequest.orderId());

    return ResponseEntity.ok("Payment is valid");
}
테스트
요청
{
	"orderId": "MC42Nzg3MTc2OTQ5ODYz",
	"amount": 1000
}
응답
"Payment is valid"
3️⃣ 결제 승인 요청 API
/**
 * 토스에 결제 승인받기
 * @param confirmPaymentRequest
 * @return
 * @throws Exception
 */
@PostMapping("/confirm")
public ResponseEntity confirmPayment(@RequestBody ConfirmPaymentRequest confirmPaymentRequest) throws Exception {

		// requestConfirm(): toss payments에 결제 승인 요청
    HttpResponse response = tossPaymentClient.requestConfirm(confirmPaymentRequest); // 토스에게 결제 승인 요청

		// 로직이 길어 스도코드로 대체
	 if response의 응답코드가 200이면
		 try 결제정보 데이터베이스 저장 시도
			 성공하면 정상적인 payment 객체 return
		 catch
			 실패하면 결제를 다시 취소시켜야 함 requestPaymentCancel() 호출
			 그후 에러코드 500 및 에러메시지 return


	response가	200이 아니면 결제가 아예 안된 것이므로 취소시킬 필요는 없음
	그냥 에러 코드 및 메시지 return

}

/**
 * 토스에게 결제 승인 요청
 */
public HttpResponse requestConfirm(ConfirmPaymentRequest confirmPaymentRequest) throws IOException, InterruptedException {
    String tossOrderId = confirmPaymentRequest.orderId();
    String amount = confirmPaymentRequest.amount();
    String tossPaymentKey = confirmPaymentRequest.paymentKey();

    // 승인 요청에 사용할 JSON 객체를 만듭니다.
    JsonNode requestObj = objectMapper.createObjectNode()
            .put("orderId", tossOrderId)
            .put("amount", amount)
            .put("paymentKey", tossPaymentKey);

    // ObjectMapper를 사용하여 JSON 객체를 문자열로 변환
    String requestBody = objectMapper.writeValueAsString(requestObj);

    // 결제 승인 API를 호출
    HttpRequest request = HttpRequest.newBuilder()
            .uri(URI.create("<https://api.tosspayments.com/v1/payments/confirm>"))
            .header("Authorization", getAuthorizations())
            .header("Content-Type", "application/json")
            .method("POST", HttpRequest.BodyPublishers.ofString(requestBody))
            .build();

    return HttpClient.newHttpClient().send(request, HttpResponse.BodyHandlers.ofString());
}

/**
 * 결제 취소 요청
 */
public HttpResponse requestPaymentCancel(String paymentKey, String cancelReason) throws IOException, InterruptedException {
    System.out.println(paymentKey);
    HttpRequest request = HttpRequest.newBuilder()
            .uri(URI.create("<https://api.tosspayments.com/v1/payments/>" + paymentKey + "/cancel"))
            .header("Authorization", getAuthorizations())
            .header("Content-Type", "application/json")
            .method("POST", HttpRequest.BodyPublishers.ofString("{\\"cancelReason\\":\\"" + cancelReason + "\\"}"))
            .build();
    return HttpClient.newHttpClient().send(request, HttpResponse.BodyHandlers.ofString());
}결제 취소로직이 들어가 있는걸 볼 수 있는데 그 이유는 다음과 같다.
결제 승인이 나면 일단 결제는 이루어진다.
하지만 데이터베이스 작업을 하다가 오류가 발생하면 해당 결제를 취소시켜야 한다.
그렇기 때문에 취소시키는 api 요청을 별도로 구현해주었다.
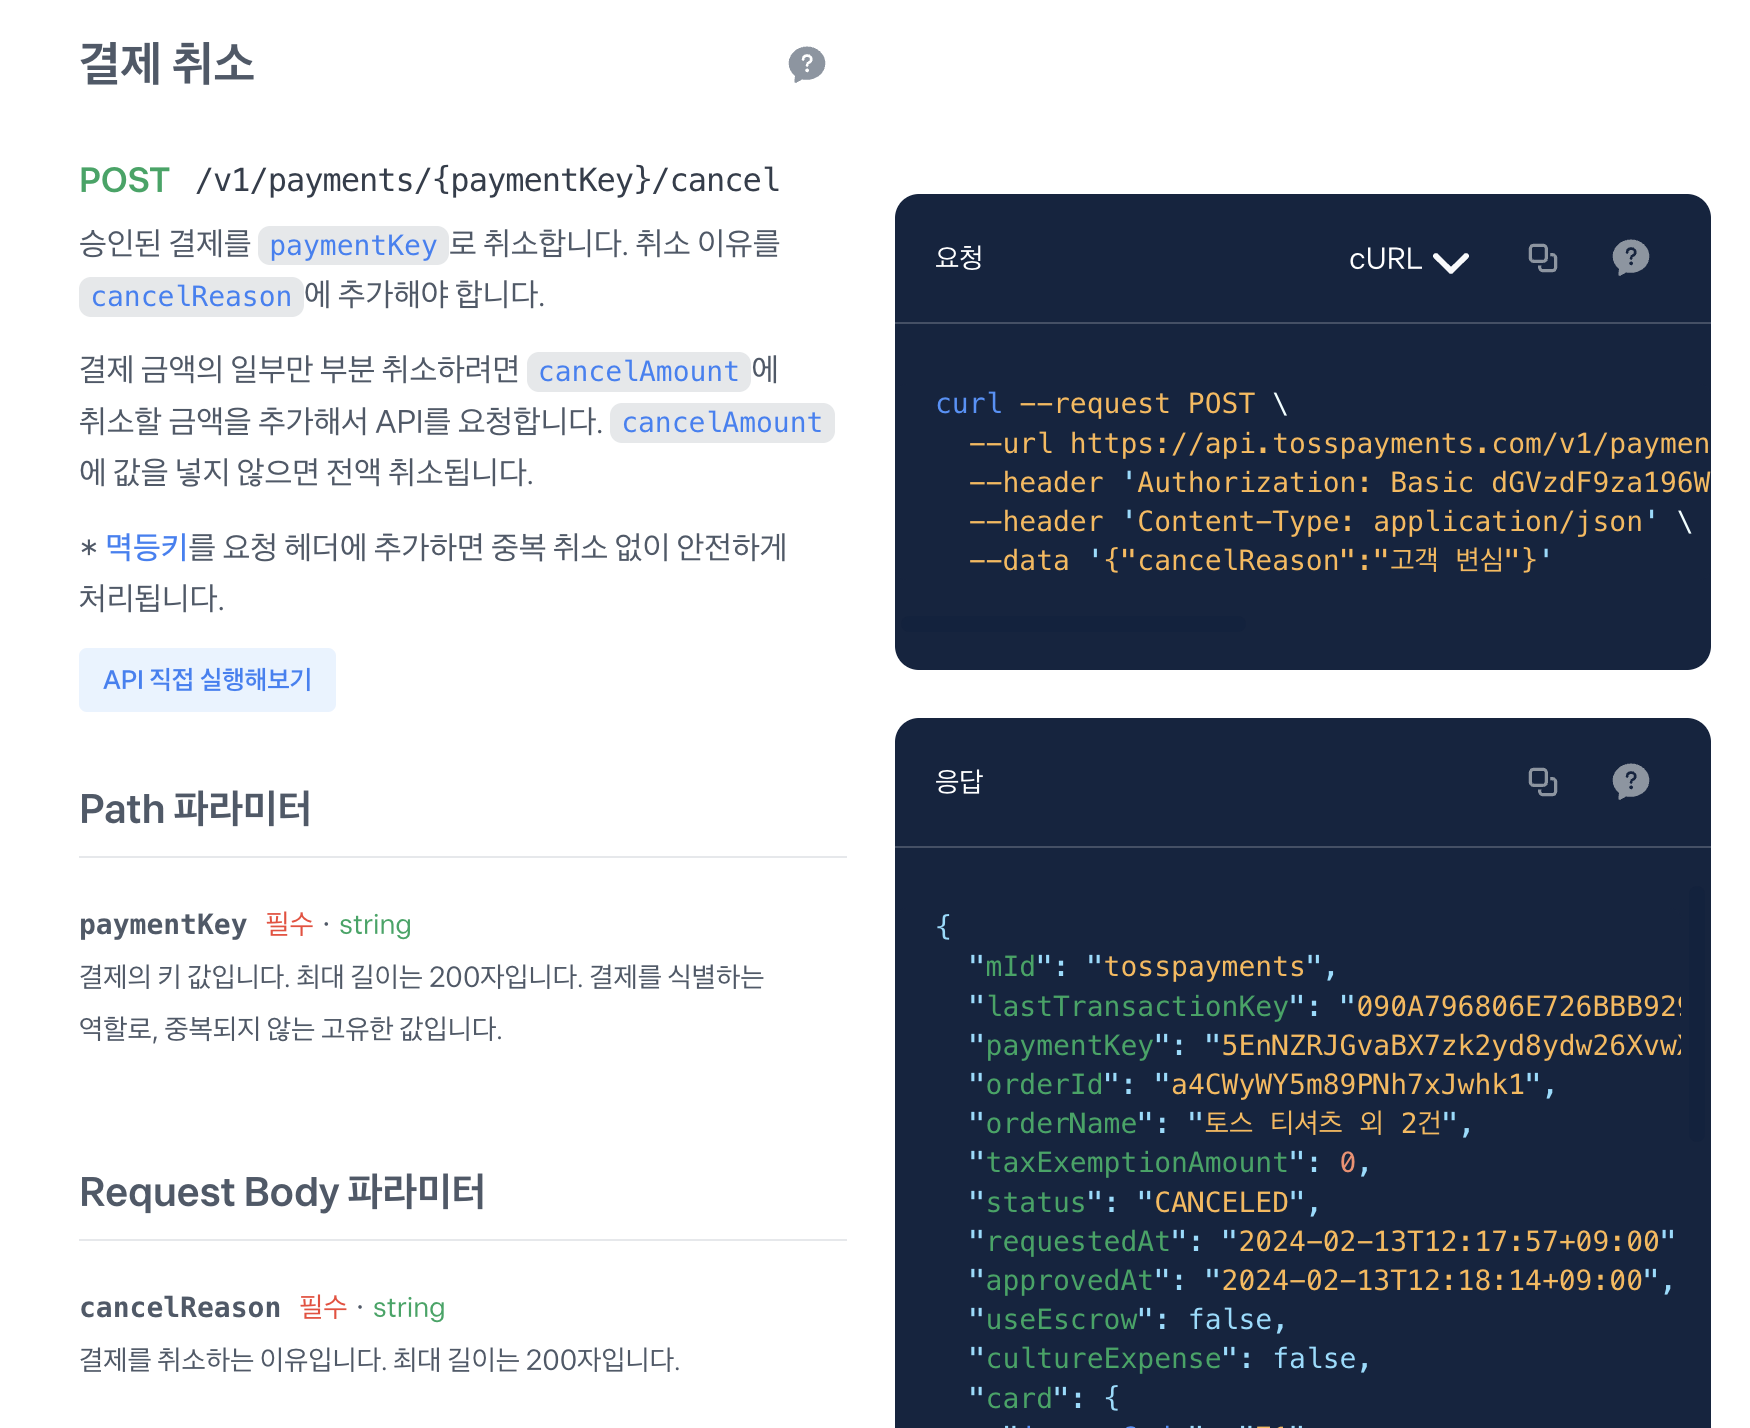
결제 취소의 경우 다음과 같은 API를 사용하면 된다.
코어 API | 토스페이먼츠 개발자센터
토스페이먼츠 API 엔드포인트(Endpoint)와 객체 정보, 파라미터, 요청 및 응답 예제를 살펴보세요.
docs.tosspayments.com
해당 API의 경우 Path variable로 paymentKey, Request Body에 cancelReason을 필수적으로 넘겨줘야 한다.
테스트
Toss Payments가 제공하는 프론트를 통해 테스트를 진행했다.
요청
{
	"amount": "1000"
	"backendOrderId":"01E79A1568CC4B39AE5D4C8EEEF9D590"
	"orderId": "MC44NjYyOTg2MjMxMzcx"
	"paymentKey":"tgen_20240912104313ewsG6"
}
응답
- 성공
{
    "backendOrderId": "01e79a1568cc4b39ae5d4c8eeef9d590",
    "tossPaymentMethod": "간편결제",
    "tossPaymentStatus": "DONE",
    "totalAmount": 1000
}

- 실패
{
    "message": "데이터베이스 오류"
    "code": 500
}

4️⃣ 결제 조회 API

/**
 * Order 테이블의 ID로 결제정보를 조회
 * @param backendOrderId
 * @return
 */
@GetMapping("/{id}")
public ResponseEntity<?> getPayment(@PathVariable("id") String backendOrderId) {
    ConfirmPaymentResponse payment = tossPaymentService.getPayment(backendOrderId);
    return ResponseEntity.ok(payment);
}해당 API같은 경우, Toss Payments를 거치는 것이 아니라 단순히 데이터베이스에서 해당 결제 정보를 받아오는 API이다.
테스트
Path 파라미터
- backendOrderId - string (필수)toss에서 제공되는 tossOrderId와는 다른 값이다..
- Order 테이블의 기본키에 해당하는 orderId값이다.
응답
{
    "backendOrderId": "01e79a1568cc4b39ae5d4c8eeef9d590",
    "tossPaymentMethod": "간편결제",
    "tossPaymentStatus": "DONE",
    "totalAmount": 1000
}

5️⃣ 결제 취소 API

/**
 * 결제 취소
 */
@PostMapping("/cancel")
public ResponseEntity cancelPayment(@RequestBody CancelPaymentRequest cancelPaymentRequest) throws IOException, InterruptedException {
    HttpResponse response = tossPaymentClient.requestPaymentCancel(cancelPaymentRequest.paymentKey(), cancelPaymentRequest.cancelReason());
    if(response.statusCode() == 200) tossPaymentService.changePaymentStatus(cancelPaymentRequest.paymentKey(), TossPaymentStatus.CANCELED);
    return ResponseEntity.status(response.statusCode()).body(response.body());
}

/**
 * 결제 취소 요청
 */
public HttpResponse requestPaymentCancel(String paymentKey, String cancelReason) throws IOException, InterruptedException {
    HttpRequest request = HttpRequest.newBuilder()
            .uri(URI.create("<https://api.tosspayments.com/v1/payments/>" + paymentKey + "/cancel"))
            .header("Authorization", getAuthorizations())
            .header("Content-Type", "application/json")
            .method("POST", HttpRequest.BodyPublishers.ofString("{\\"cancelReason\\":\\"" + cancelReason + "\\"}"))
            .build();
    return HttpClient.newHttpClient().send(request, HttpResponse.BodyHandlers.ofString());
}위에서 승인시에 사용했던 결제 취소 요청 코드를 재사용했다.
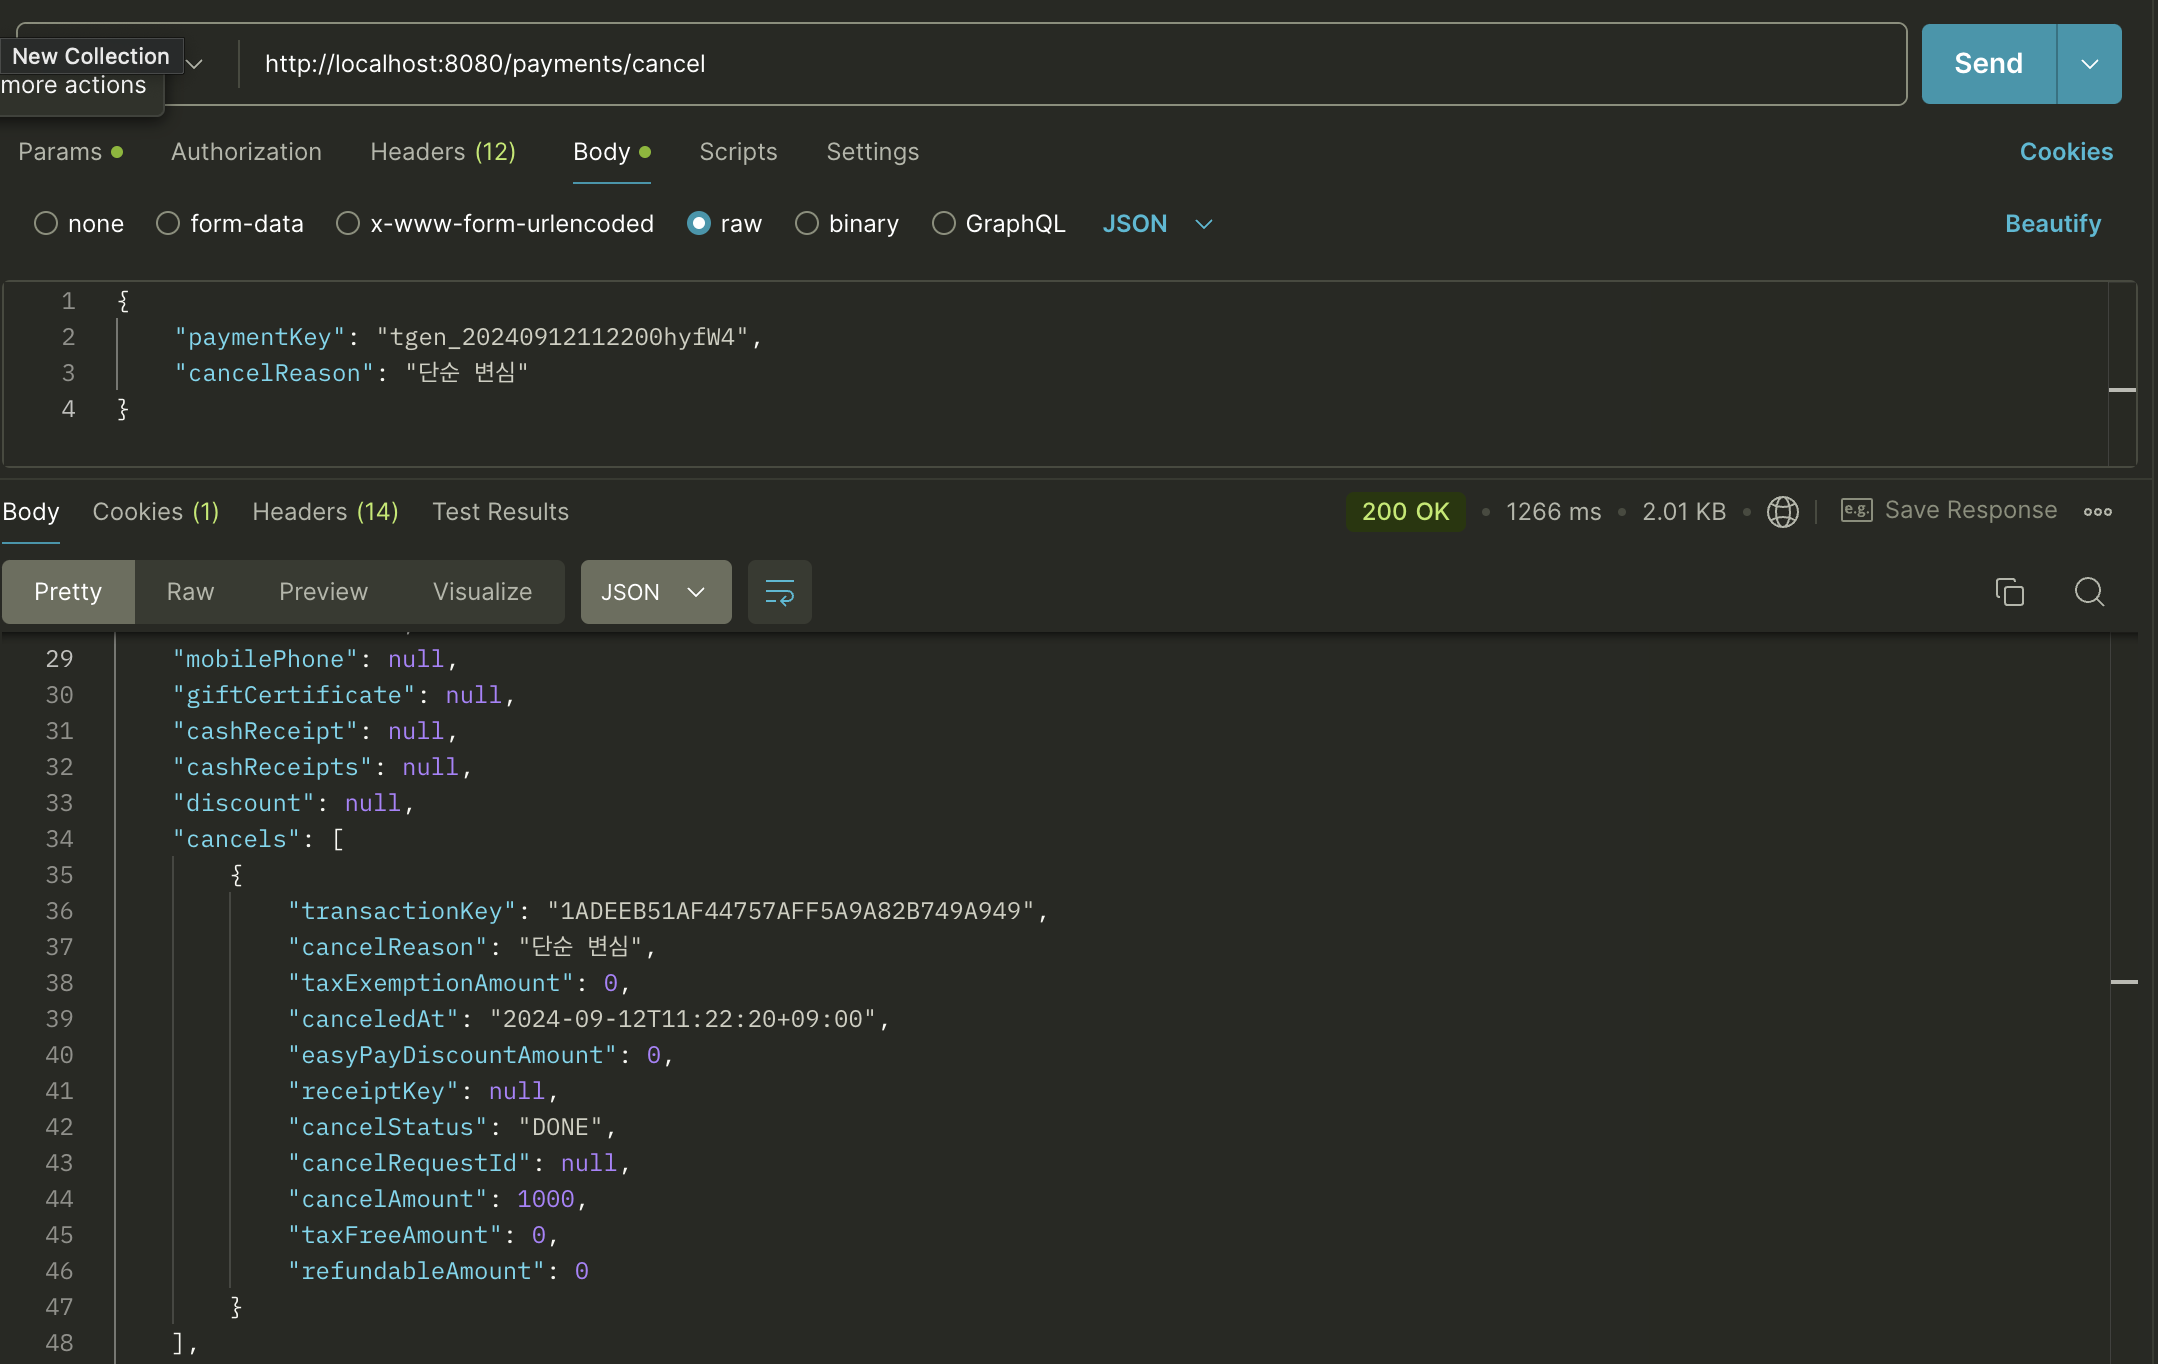
테스트
요청
{
    "paymentKey": "tgen_20240912110836g1MW8",
    "cancelReason": "단순 변심"
}
응답
{
    "mId": "tgen_docs",
    "lastTransactionKey": "1ADEEB51AF44757AFF5A9A82B749A949",
    "paymentKey": "tgen_20240912112200hyfW4",
    "orderId": "MC4yMTUxMTcyNzIzNDU3",
    "orderName": "토스 티셔츠 외 2건",
    "taxExemptionAmount": 0,
    "status": "CANCELED",
    "requestedAt": "2024-09-12T11:22:00+09:00",
    "approvedAt": "2024-09-12T11:22:11+09:00",
    "useEscrow": false,
    "cultureExpense": false,
    "card": {
        "issuerCode": "11",
        "acquirerCode": "11",
        "number": "94909431****060*",
        "installmentPlanMonths": 0,
        "isInterestFree": false,
        "interestPayer": null,
        "approveNo": "00000000",
        "useCardPoint": false,
        "cardType": "체크",
        "ownerType": "개인",
        "acquireStatus": "READY",
        "amount": 1000
    },
    "virtualAccount": null,
    "transfer": null,
    "mobilePhone": null,
    "giftCertificate": null,
    "cashReceipt": null,
    "cashReceipts": null,
    "discount": null,
    "cancels": [
        {
            "transactionKey": "1ADEEB51AF44757AFF5A9A82B749A949",
            "cancelReason": "단순 변심",
            "taxExemptionAmount": 0,
            "canceledAt": "2024-09-12T11:22:20+09:00",
            "easyPayDiscountAmount": 0,
            "receiptKey": null,
            "cancelStatus": "DONE",
            "cancelRequestId": null,
            "cancelAmount": 1000,
            "taxFreeAmount": 0,
            "refundableAmount": 0
        }
    ],
    "secret": "ps_BX7zk2yd8yzK47RP1Dov3x9POLqK",
    "type": "NORMAL",
    "easyPay": {
        "provider": "토스페이",
        "amount": 0,
        "discountAmount": 0
    },
    "country": "KR",
    "failure": null,
    "isPartialCancelable": true,
    "receipt": {
        "url": "<https://dashboard.tosspayments.com/receipt/redirection?transactionId=tgen_20240912112200hyfW4&ref=PX>"
    },
    "checkout": {
        "url": "<https://api.tosspayments.com/v1/payments/tgen_20240912112200hyfW4/checkout>"
    },
    "currency": "KRW",
    "totalAmount": 1000,
    "balanceAmount": 0,
    "suppliedAmount": 0,
    "vat": 0,
    "taxFreeAmount": 0,
    "method": "간편결제",
    "version": "2022-11-16",
    "metadata": null
}

✅ 마치며
결제 외부 API를 도입해본적이 한번도 없는 나도 이렇게 손쉽게 구현이 가능할 정도로 매우 좋은 API 문서를 제공하는 것 같다. 덕분에 즐거운 경험이 되었던 것 같다.
'데브코스 > 실습 & 프로젝트' 카테고리의 다른 글
| [2-3차 프로젝트] 블루/그린 배포 방식으로 CI/CD 파이프라인 구축하기 - 2. CI/CD 파이프라인 구축 (0) | 2024.10.27 |
|---|---|
| [2-3차 프로젝트] 블루/그린 배포 방식으로 CI/CD 파이프라인 구축하기 - 1. 인프라 구성하기 (0) | 2024.10.27 |
| [1차 프로젝트] 코드리뷰 피드백 반영하기 (1) | 2024.09.09 |
| [1차 프로젝트] 기본키를 UUID로 할 때 주의점과 JPA 엔티티의 기본키 타입 고민 (1) | 2024.09.07 |
| 게시판 만들기 - 데이터 계층 리팩토링 (JPA 도입) (2) | 2024.09.02 |